Raspberry Pi AI HAT+ 사용법
Hailo-8 AI accelerator기반 Raspberry Pi AI HAT+를 Raspberry Pi 5에서 사용해본 과정을 다루고 있습니다. Yolo 예제를 실행해봅니다.
2025.9.21 최초작성
2025.9.25 욜로 예제 수정
다음 라즈베리파이 문서를 따라 진행했습니다.
https://www.raspberrypi.com/documentation/accessories/ai-hat-plus.html
Raspberry Pi 5에서만 가능합니다.
Raspberry Pi 5 사용법은 다음 포스트를 참고하세요.
Raspberry Pi 5 사용 방법
https://webnautes.kr/raspberry-pi-5-sayong-bangbeob/
설치
1.다음 명령을 사용하여 라즈베리파이의 패키지를 최신 버전으로 업그레이드해야합니다.
sudo apt update && sudo apt full-upgrade
진행중에 다음 메시지가 보일때 디폴트로 두려고 엔터를 눌렀습니다.
Configuration file '/etc/initramfs-tools/initramfs.conf'
 ==> Modified (by you or by a script) since installation.
 ==> Package distributor has shipped an updated version.
   What would you like to do about it ?  Your options are:
    Y or I  : install the package maintainer's version
    N or O  : keep your currently-installed version
      D     : show the differences between the versions
      Z     : start a shell to examine the situation
 The default action is to keep your current version.
*** initramfs.conf (Y/I/N/O/D/Z) [default=N] ?
설치 완료 후, 다음 명령을 사용하여 라즈베리파이를 재부팅했습니다.
sudo reboot
2.다음 명령을 사용하여 라즈베리파이 펌웨어가 최신 상태인지 확인합니다.
sudo rpi-eeprom-update
2023년 12월 6일 이전 날짜가 표시되는 경우 2-1을 진행하고 2023년 12월 6일 이후 날짜가 표시된다면 본 단계를 건너띄고 2-2를 진행하세요.
다음처럼 출력되어서 2-2를 진행합니다.
 $ sudo rpi-eeprom-update
BOOTLOADER: up to date
   CURRENT: Thu  8 May 14:13:17 UTC 2025 (1746713597)
    LATEST: Thu  8 May 14:13:17 UTC 2025 (1746713597)
   RELEASE: default (/usr/lib/firmware/raspberrypi/bootloader-2712/default)
            Use raspi-config to change the release.
2-1. 다음 명령을 사용하여 설정을 실행합니다.
sudo raspi-config
Advanced Options > Bootloader Version에서 choose Latest를 선택합니다. 그런 다음 Finish를 선택하여 raspi-config를 종료합니다.
2-2.다음 명령을 실행하여 펌웨어를 최신 버전으로 업데이트합니다.
sudo rpi-eeprom-update -a
이미 최신버전이라 업데이트는 없었습니다.
$ sudo rpi-eeprom-update -a
BOOTLOADER: up to date
   CURRENT: Thu  8 May 14:13:17 UTC 2025 (1746713597)
    LATEST: Thu  8 May 14:13:17 UTC 2025 (1746713597)
   RELEASE: default (/usr/lib/firmware/raspberrypi/bootloader-2712/default)
            Use raspi-config to change the release.
2-3. 펌웨어 업데이트를 했다면 다음 명령을 사용하여 라즈베리파이를 재부팅합니다.
sudo reboot
3.라즈베리파이의 전원을 분리합니다.
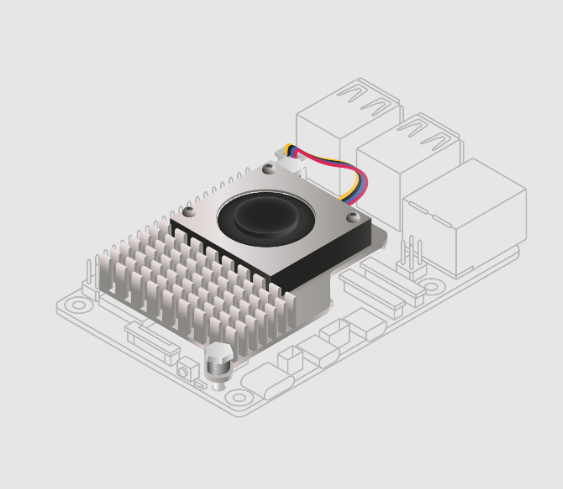
4.최상의 성능을 위해 AI HAT+를 라즈베리파이 액티브 쿨러와 함께 사용하는 것을 권장합니다.
하드웨어 준비
Raspberry Pi AI Hat+를 Raspberry Pi 5에 연결을 해야 합니다.
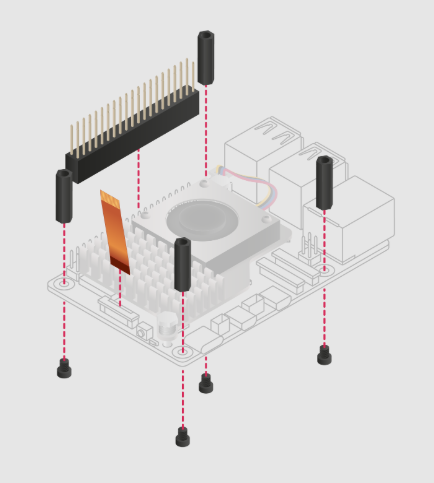
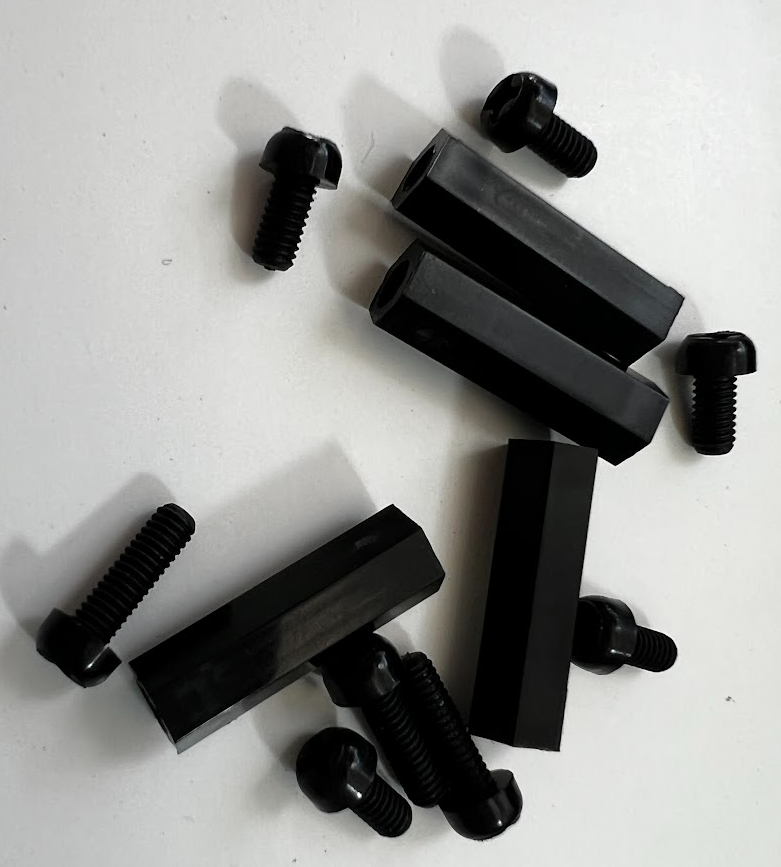
1.제공된 나사 4개를 사용하여 스페이서를 고정하고 라즈베리파이 GPIO 핀 위에 GPIO 스태킹 헤더를 끼워줍니다.
스페이서와 나사
GPIO 스태킹 헤더

연결 후 모습
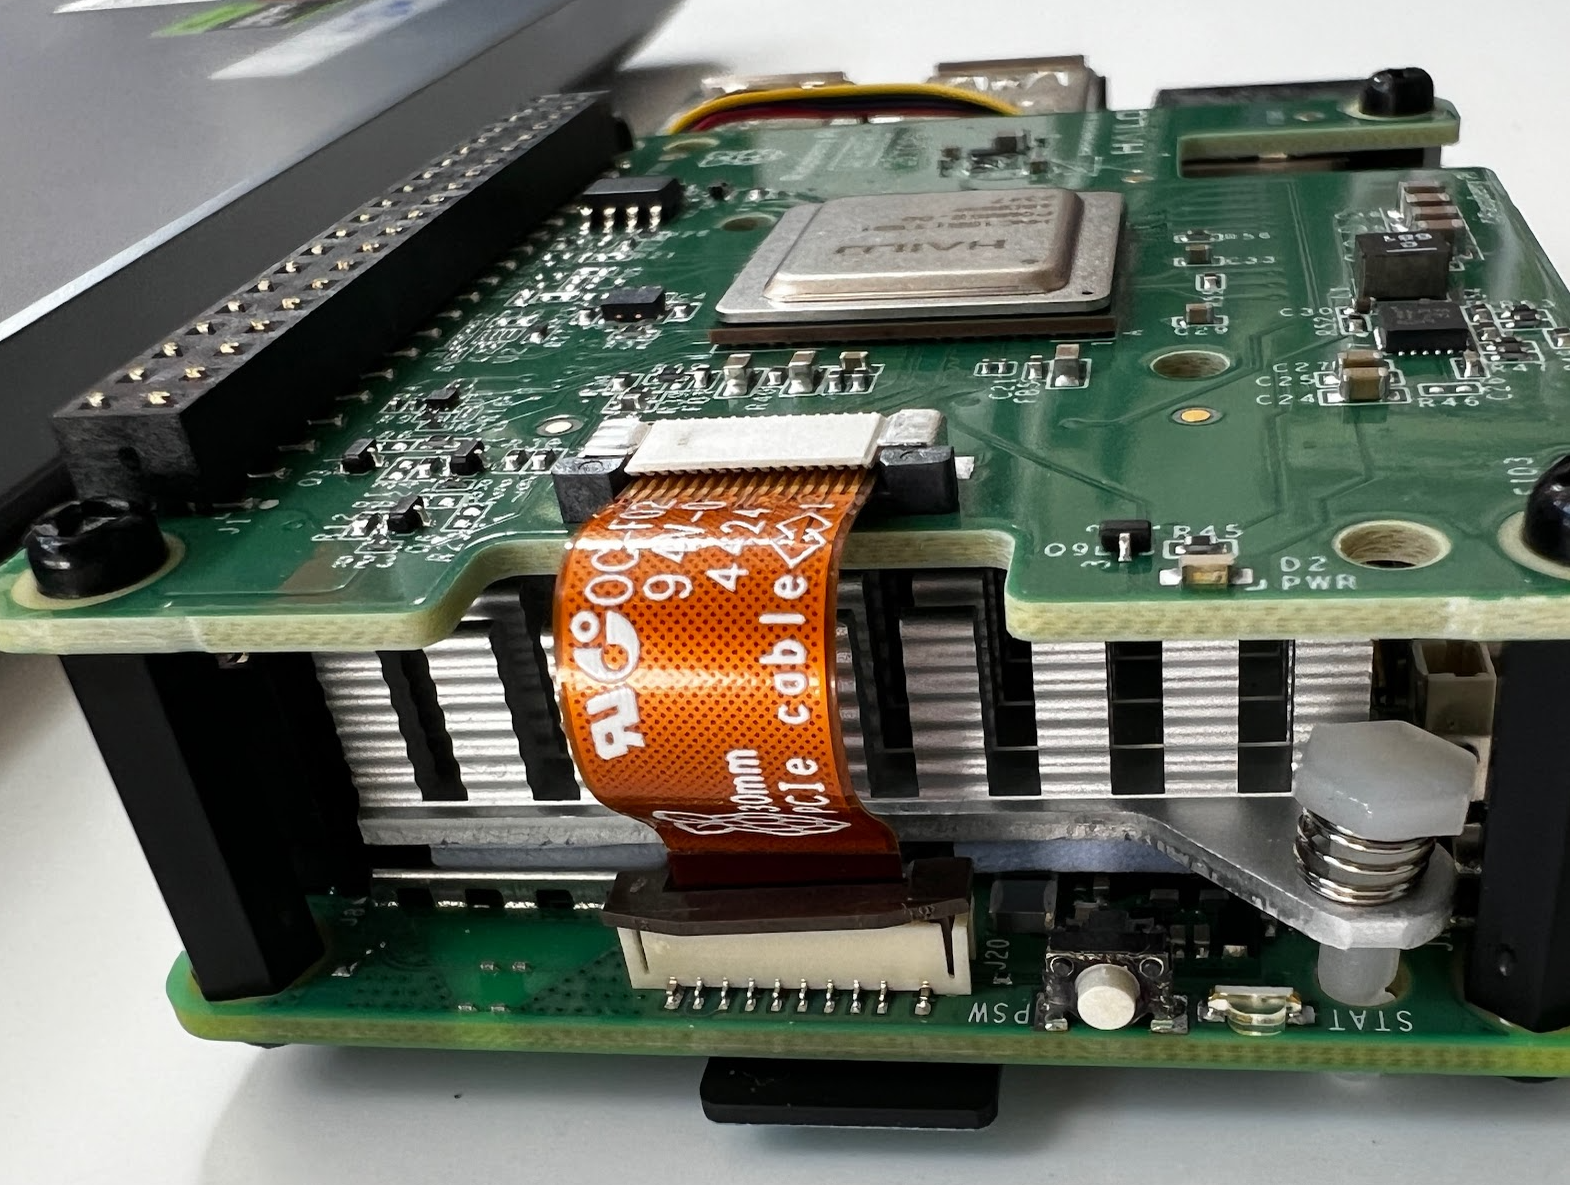
문서에서는 AI HAT+에서 리본 케이블을 분리한 후 하라고 되어있지만 분리하지 않았습니다. 바로 라즈베리파이의 케이블 홀더를 들어올린 다음 구리 접점이 보드안쪽을 향하도록 케이블을 삽입한 후, 케이블 홀더를 아래로 밀어 리본 케이블을 고정합니다.
AI HAT+ 보드
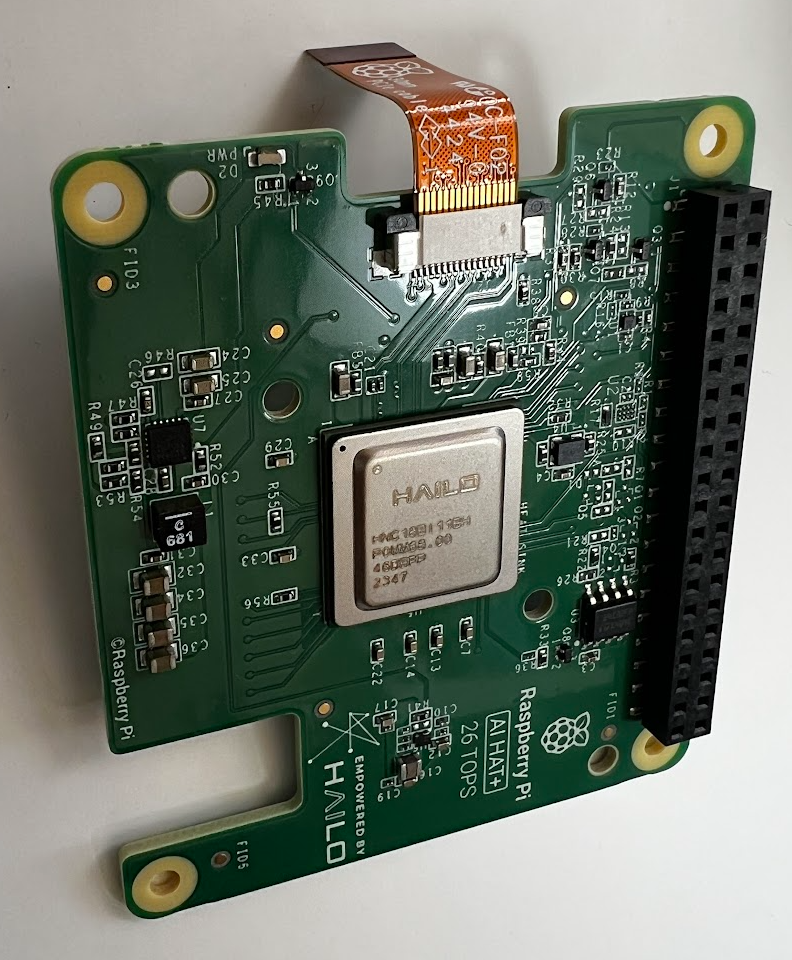
연결후 모습
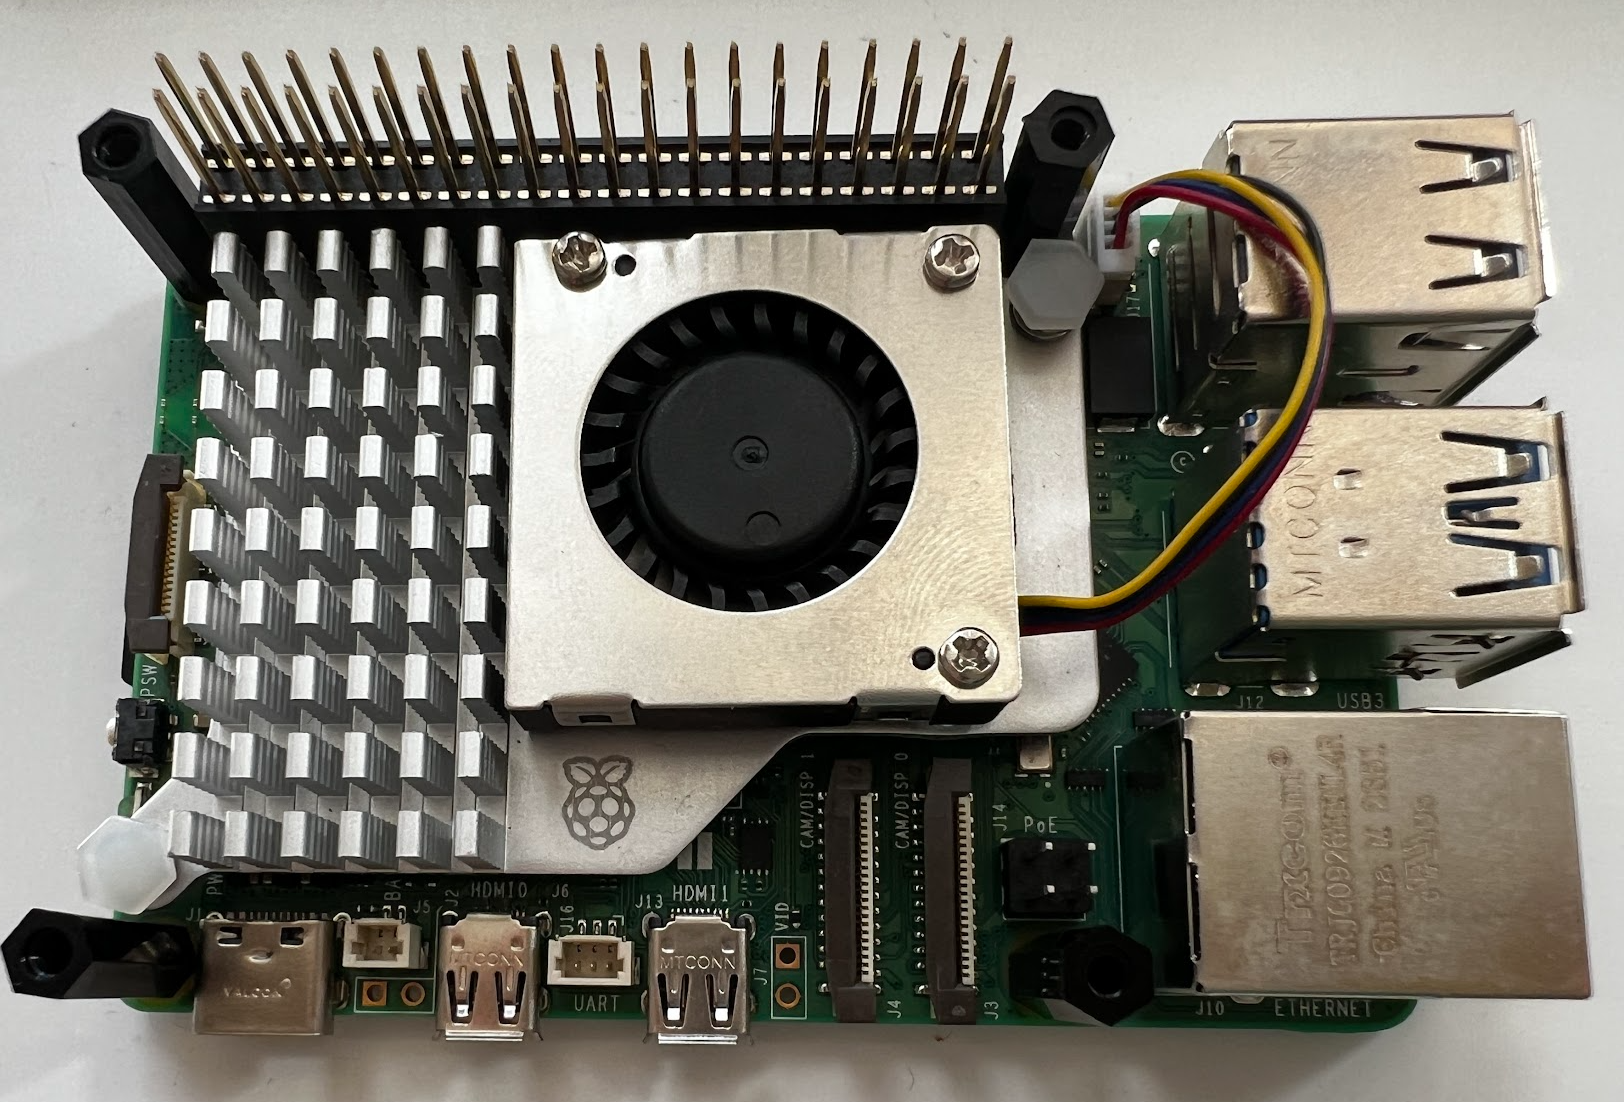
2.스페이서 위에 AI HAT+를 놓고 나머지 4개의 나사를 사용하여 제자리에 고정합니다.
연결 후 모습

소프트웨어 설치
1.라즈베리파이에 전원을 연결합니다.
다음처럼 Hailo-8 AI Processor가 잡힌 것을 볼 수 있습니다.
pi@raspberrypi:~ $ lspci
0001:00:00.0 PCI bridge: Broadcom Inc. and subsidiaries BCM2712 PCIe Bridge (rev 21)
0001:01:00.0 Co-processor: Hailo Technologies Ltd. Hailo-8 AI Processor (rev 01)
0002:00:00.0 PCI bridge: Broadcom Inc. and subsidiaries BCM2712 PCIe Bridge (rev 21)
0002:01:00.0 Ethernet controller: Raspberry Pi Ltd RP1 PCIe 2.0 South Bridge
이제부턴 다음 문서를 따라진행합니다.
https://www.raspberrypi.com/documentation/computers/ai.html
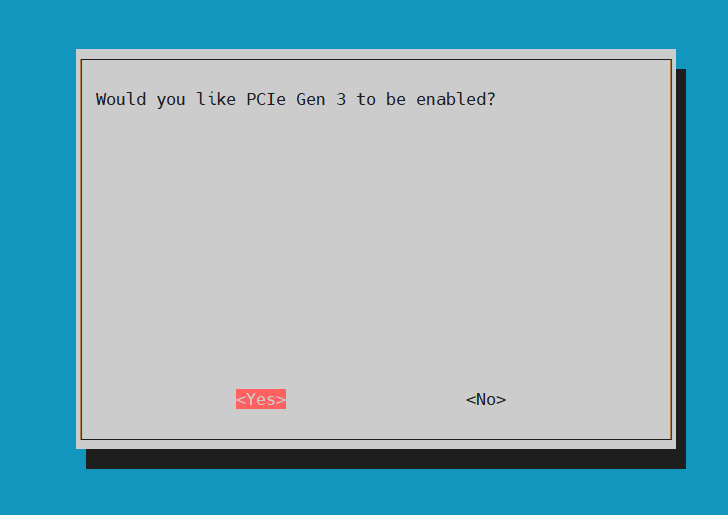
2.라즈베리파이 설정 프로그램을 실행합니다.
sudo raspi-config
Advanced Options > PCIe Speed를 선택하여 활성화 하고 설정 프로그램을 종료후 재부팅합니다.
3.필요한 패키지를 설치합니다.
sudo apt install hailo-all
다음 명령을 사용하여 라즈베리파이를 재부팅합니다.
sudo reboot
4.올바로 설치되었는지 확인합니다.
pi@raspberrypi:~ $ hailortcli fw-control identify
Executing on device: 0001:01:00.0
Identifying board
Control Protocol Version: 2
Firmware Version: 4.20.0 (release,app,extended context switch buffer)
Logger Version: 0
Board Name: Hailo-8
Device Architecture: HAILO8
Serial Number: <N/A>
Part Number: <N/A>
Product Name: <N/A>
참고한 문서에 따르면 AI HAT+ 디바이스는 일련 번호, 부품 번호, 제품 이름이 위 로그처럼 < N/A>로 표시될 수 있다고 합니다.
다음처럼도 상태를 확인할 수 있습니다.
pi@raspberrypi:~ $ dmesg | grep -i hailo
[    2.044027] hailo: Init module. driver version 4.20.0
[    2.044107] hailo 0001:01:00.0: Probing on: 1e60:2864...
[    2.044111] hailo 0001:01:00.0: Probing: Allocate memory for device extension, 13184
[    2.044126] hailo 0001:01:00.0: enabling device (0000 -> 0002)
[    2.044130] hailo 0001:01:00.0: Probing: Device enabled
[    2.044145] hailo 0001:01:00.0: Probing: mapped bar 0 - 00000000f675d04d 16384
[    2.044149] hailo 0001:01:00.0: Probing: mapped bar 2 - 00000000d2e22ee4 4096
[    2.044151] hailo 0001:01:00.0: Probing: mapped bar 4 - 00000000eaa29e22 16384
[    2.044154] hailo 0001:01:00.0: Probing: Force setting max_desc_page_size to 4096 (recommended value is 16384)
[    2.044163] hailo 0001:01:00.0: Probing: Enabled 64 bit dma
[    2.044165] hailo 0001:01:00.0: Probing: Using userspace allocated vdma buffers
[    2.044167] hailo 0001:01:00.0: Disabling ASPM L0s
[    2.044170] hailo 0001:01:00.0: Successfully disabled ASPM L0s
[    2.057124] hailo 0001:01:00.0: Writing file hailo/hailo8_fw.bin
[    2.116243] hailo 0001:01:00.0: File hailo/hailo8_fw.bin written successfully
[    2.116254] hailo 0001:01:00.0: Writing file hailo/hailo8_board_cfg.bin
[    2.116278] Failed to write file hailo/hailo8_board_cfg.bin
[    2.116280] hailo 0001:01:00.0: File hailo/hailo8_board_cfg.bin written successfully
[    2.116281] hailo 0001:01:00.0: Writing file hailo/hailo8_fw_cfg.bin
[    2.116289] Failed to write file hailo/hailo8_fw_cfg.bin
[    2.116290] hailo 0001:01:00.0: File hailo/hailo8_fw_cfg.bin written successfully
[    2.252885] hailo 0001:01:00.0: NNC Firmware loaded successfully
[    2.252892] hailo 0001:01:00.0: FW loaded, took 195 ms
[    2.266183] hailo 0001:01:00.0: Probing: Added board 1e60-2864, /dev/hailo0
5.참고한 문서에서는 라즈베리파이 카메라를 사용한 예제를 실행하는 방법을 설명하고 있습니다. 전 웹캠을 사용하여 진행하려고 하기 때문에 여기에서는 다루지 않습니다. 다음 문서를 참고하세요. 찾은 방법에서도 라즈베리파이 카메라도 사용가능합니다.
https://www.raspberrypi.com/documentation/computers/ai.html
대신 다음 깃허브를 진행합니다.
https://github.com/hailo-ai/hailo-rpi5-examples
깃허브 저장소를 다운로드하여 설치합니다. 꽤 시간이 걸립니다.
git clone https://github.com/hailo-ai/hailo-rpi5-examples.git

cd hailo-rpi5-examples./install.sh

./install.sh
예제 실행전 한번 다음 명령을 실행해서 실행환경을 설정해야 합니다.
source setup_env.sh
파이썬으로 작성된 예제들이 준비되어 있습니다.
우선 간단한 검출(detection ) 예제를 실행해봅니다.
python basic_pipelines/detection_simple.py
비디오 파일에서 욜로 검출 결과를 보여주는 듯합니다.
터미널에서 Ctrl + C를 누르면 중지됩니다.

이제 카메라를 사용한 검출을 해봅니다. 사용하는 카메라에 따라 옵션을 다르게 줘야합니다.
라즈베리파이 카메라
python basic_pipelines/detection.py --input rpi
웹캠
python basic_pipelines/detection.py --input usb
너무 딜레이가 심합니다.실행 결과입니다.
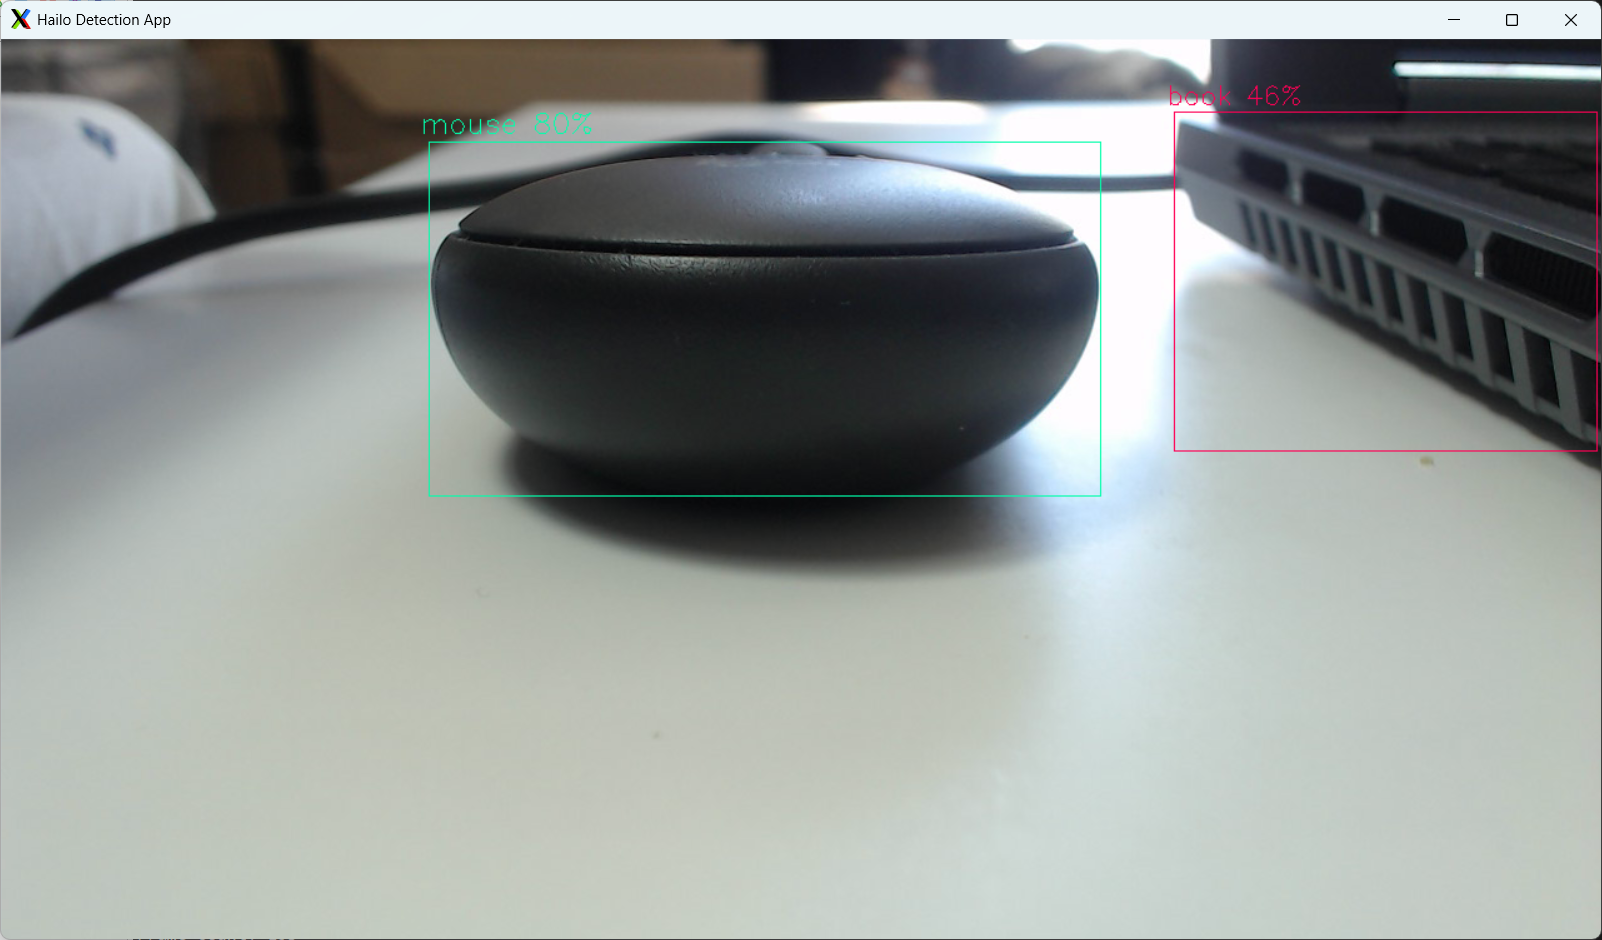
사용하는 웹캠에서 설정된 1280 x 720 해상도를 사용해서 느립니다.
다음 파일을 열어서 640x480으로 강제로 수정하고 프레임레이트도 10으로 낮춥니다.
$ nano ./venv_hailo_rpi_examples/lib/python3.11/site-packages/hailo_apps/hailo_app_python/apps/detection/detection_pipeline.py
수정전
    def get_pipeline_string(self):
        source_pipeline = SOURCE_PIPELINE(video_source=self.video_source,
                                          video_width=self.video_width, video_height=self.video_height,
                                          frame_rate=self.frame_rate, sync=self.sync)
수정후(2025.9.25 코드를 개선했습니다. 영상의 경우엔 절반으로 해상도를 줄이고 웹캠은 640x480 해상도를 사용합니다.)
    def get_pipeline_string(self):


        if '/dev/video' in self.video_source:
            video_width = 640
            video_height = 480
        else:
            video_width = int(self.video_width/2)
            video_height = int(self.video_height/2)

        source_pipeline = SOURCE_PIPELINE(video_source=self.video_source,
                                          video_width=video_width, video_height=video_height,
                                          sync=self.sync)
        source_pipeline += " ! videorate ! video/x-raw,framerate=10/1"
해상도가 작아진 점이 아쉽지만 성능이 괜찮게 나오네요.
그래서 해상도를 1280x780으로 하고 프레임레이트만 10으로 낮춰봤지만 영상에 잔상이 생기고 느린감이 있습니다.
좀 더 사용해보면서 개선점을 찾아야 겠습니다.
2025.9.25
다음처럼 동영상 파일에 대해 테스트를 할 수 있습니다.
python basic_pipelines/detection.py --input IMG_6073.MOV