간단히 사용해본 도커(Docker)
문득 떠오른 아이디어대로 도커를 간단히 사용해봤어요. 단계별로 패키지를 설치하고 이미지를 생성한 후. 최종적으로 Dockerfile을 생성하여 이미지를 생성하는거죠.
2025.7 25 최초작성
도커 설치
도커를 설치합니다.
1. 필수 패키지 설치
필요한 패키지를 설치합니다.
sudo apt update

sudo apt install ca-certificates curl gnupg lsb-release
2. Docker GPG 키 추가
Docker GPG 키를 추가합니다.
sudo mkdir -p /etc/apt/keyrings

curl -fsSL https://download.docker.com/linux/ubuntu/gpg | sudo gpg --dearmor -o /etc/apt/keyrings/docker.gpg
3. Docker 저장소 추가
Docker 저장소를 추가합니다.
echo \
  "deb [arch=$(dpkg --print-architecture) signed-by=/etc/apt/keyrings/docker.gpg] \
  https://download.docker.com/linux/ubuntu \
  $(lsb_release -cs) stable" | \
  sudo tee /etc/apt/sources.list.d/docker.list > /dev/null
4. Docker 설치
Docker를 설치합니다.
sudo apt update

sudo apt install docker-ce docker-ce-cli containerd.io docker-buildx-plugin docker-compose-plugin
5. 설치 확인
도커가 문제없이 설치되었는지 확인해봅니다.
sudo docker version
webnautes@webnautes-laptop:~$ sudo docker version
Client: Docker Engine - Community
Version: 28.3.2
API version: 1.51
Go version: go1.24.5
Git commit: 578ccf6
Built: Wed Jul 9 16:13:45 2025
OS/Arch: linux/amd64
Context: default
Server: Docker Engine - Community
Engine:
Version: 28.3.2
API version: 1.51 (minimum version 1.24)
Go version: go1.24.5
Git commit: e77ff99
Built: Wed Jul 9 16:13:45 2025
OS/Arch: linux/amd64
Experimental: false
containerd:
Version: 1.7.27
GitCommit: 05044ec0a9a75232cad458027ca83437aae3f4da
runc:
Version: 1.2.5
GitCommit: v1.2.5-0-g59923ef
docker-init:
Version: 0.19.0
GitCommit: de40ad0
도커를 테스트해봅니다.
sudo docker run hello-world
webnautes@webnautes-laptop:~$ sudo docker run hello-world
Unable to find image 'hello-world:latest' locally
latest: Pulling from library/hello-world
e6590344b1a5: Pull complete
Digest: sha256:ec153840d1e635ac434fab5e377081f17e0e15afab27beb3f726c3265039cfff
Status: Downloaded newer image for hello-world:latest
Hello from Docker!
This message shows that your installation appears to be working correctly.
To generate this message, Docker took the following steps:
1. The Docker client contacted the Docker daemon.
2. The Docker daemon pulled the "hello-world" image from the Docker Hub.
(amd64)
3. The Docker daemon created a new container from that image which runs the
executable that produces the output you are currently reading.
4. The Docker daemon streamed that output to the Docker client, which sent it
to your terminal.
To try something more ambitious, you can run an Ubuntu container with:
$ docker run -it ubuntu bash
Share images, automate workflows, and more with a free Docker ID:
https://hub.docker.com/
For more examples and ideas, visit:
https://docs.docker.com/get-started/
7. sudo 없이 docker 명령어 사용하기
sodo 명령없이 docker 명령어를 사용할 수 있도록 합니다.
sudo usermod -aG docker $USER
newgrp docker
도커 이미지 테스트
이제 도커에서 컨테이너를 생성하여 패키지 설치 후, 이미지로 저장하는 테스트를 해봅니다.
1. Ubuntu 컨테이너 실행 및 build-essential 설치
my-build-essential 이름으로 컨테이너를 실행합니다.
docker run -it --name my-build-essential ubuntu:24.04
webnautes@webnautes-laptop:~$ docker run -it --name my-build-essential ubuntu:24.04
Unable to find image 'ubuntu:24.04' locally
24.04: Pulling from library/ubuntu
32f112e3802c: Pull complete
Digest: sha256:a08e551cb33850e4740772b38217fc1796a66da2506d312abe51acda354ff061
Status: Downloaded newer image for ubuntu:24.04
root@fc6f4678af03:/#
프롬프트가 root@fc6f4678af03:/# 처럼 보입니다.
이제 컨테이너 안에서 다음 명령을 실행하여 build-essential 패키지를 설치한 후 exit를 눌러 빠져나옵니다.
apt update

apt install -y build-essential

exit
실행중인 도커 컨테이너를 확인합니다.
docker ps -a
방금 종료한 my-build-essential 컨테이너가 보입니다.
webnautes@webnautes-laptop:~$ docker ps -a
CONTAINER ID IMAGE COMMAND CREATED STATUS PORTS NAMES
e5e35a9dae64 ubuntu:24.04 "/bin/bash" 2 minutes ago Exited (0) About a minute ago my-build-essential
71569d5ecb56 hello-world "/hello" 3 minutes ago Exited (0) 3 minutes ago affectionate_thompson
2. 이미지로 저장
my-build-essential 컨테이너를 ubuntu-with-build-essential 이미지로 저장합니다.
docker commit -m "Installed build-essential on Ubuntu 24.04" -a "webnautes" my-build-essential ubuntu-with-build-essential
도커 이미지를 확인합니다. ubuntu-with-build-essential가 있는 것을 볼 수 있습니다.
$ docker images
REPOSITORY TAG IMAGE ID CREATED SIZE
ubuntu-with-build-essential latest 46621a89526f 20 seconds ago 451MB
hello-world latest 74cc54e27dc4 6 months ago 10.1kB
3. 중간 컨테이너 정리
앞에서 사용했던 my-build-essential 컨테이너를 삭제합니다.
docker rm my-build-essential
my-build-essential 컨테이너가 삭제되었습니다.
$ docker ps -a
CONTAINER ID IMAGE COMMAND CREATED STATUS PORTS NAMES
71569d5ecb56 hello-world "/hello" 5 minutes ago Exited (0) 5 minutes ago affectionate_thompson
4. build-essential 이미지로 컨테이너 실행 및 qt5 설치
ubuntu-with-build-essential 이미지를 기반으로 my-qt5라는 이름의 새 컨테이너를 생성합니다.
docker run -it --name my-qt5 ubuntu-with-build-essential
이제 컨테이너 안에서 명령을 실행하여 qt 패키지를 설치한 후 exit를 눌러 빠져나옵니다.
apt update

apt install -y qtbase5-dev qttools5-dev-tools qtcreator

exit
5. 최종 이미지로 저장
my-qt5 컨테이너를 ubuntu-with-build-essential-qt5 이미지로 저장합니다.
docker commit -m "Installed qt5 development tools and qtcreator" -a "webnautes" my-qt5 ubuntu-with-build-essential-qt5
도커 이미지를 확인합니다. ubuntu-with-build-essential-qt5 이미지가 있는 것을 볼 수 있습니다.
webnautes@webnautes-laptop:~$ docker images
REPOSITORY TAG IMAGE ID CREATED SIZE
ubuntu-with-build-essential-qt5 latest cd632ff4ef55 16 seconds ago 2.62GB
ubuntu-with-build-essential latest 46621a89526f 23 hours ago 451MB
hello-world latest 74cc54e27dc4 6 months ago 10.1kB
6. 중간 컨테이너 및 이미지 정리
my-qt5 컨테이너와 앞서 만든 이미지를 삭제합니다.
docker rm my-qt5

docker rmi ubuntu-with-build-essential
이제 ubuntu-with-build-essential-qt5 이미지만 있습니다. hello-world 이미지는 도커 설치후 테스트할때 사용된 것입니다.
$ docker images
REPOSITORY TAG IMAGE ID CREATED SIZE
ubuntu-with-build-essential-qt5 latest cd632ff4ef55 4 minutes ago 2.62GB
hello-world latest 74cc54e27dc4 6 months ago 10.1kB
7. 이미지 커밋 주석 확인
이젠 Dockerfile 작성 전 필요한 변경 이력을 확인합니다. 사용한 명령어까지는 알 수 없다더군요. 문득 도커 이미지를 실행후 history 명령을 사용하면 찾을 수 있을거 같군요.
webnautes@webnautes-laptop:~$ docker history ubuntu-with-build-essential-qt5
IMAGE          CREATED              CREATED BY                                       SIZE      COMMENT
cd632ff4ef55   About a minute ago   /bin/bash                                        2.17GB    Installed qt5 development tools and qtcreator
46621a89526f   23 hours ago         /bin/bash                                        373MB     Installed build-essential on Ubuntu 24.04
65ae7a6f3544   8 days ago           /bin/sh -c #(nop)  CMD ["/bin/bash"]             0B
<missing>      8 days ago           /bin/sh -c #(nop) ADD file:b4619a63cd7829e13…   78.1MB
<missing>      8 days ago           /bin/sh -c #(nop)  LABEL org.opencontainers.…   0B
<missing>      8 days ago           /bin/sh -c #(nop)  LABEL org.opencontainers.…   0B
<missing>      8 days ago           /bin/sh -c #(nop)  ARG LAUNCHPAD_BUILD_ARCH      0B
<missing>      8 days ago           /bin/sh -c #(nop)  ARG RELEASE                   0B
최종 이미지를 다음처럼 실행할 수 있습니다.
docker run -it ubuntu-with-build-essential-qt5
이 이미지에는 build-essential, qt5, qtcreator가 설치되어 있습니다.
Dockerfile 생성
앞에서 진행한 대로 다음 이름으로 Dockerfile 이름의 파일을 생성합니다.
FROM ubuntu:24.04

LABEL maintainer="webnautes"
LABEL description="Ubuntu with build-essential and Qt5 development tools"

# non-interactive 모드 설정 및 패키지 설치
RUN apt update && \
    export DEBIAN_FRONTEND=noninteractive && \
    apt install -y build-essential qtbase5-dev qttools5-dev-tools qtcreator && \
    apt clean && \
    rm -rf /var/lib/apt/lists/*

CMD ["/bin/bash"]
다음 명령을 사용하여 이미지를 빌드할 수 있습니다.
docker build -t ubuntu-with-build-essential-qt5-build .
도커 이미지를 확인합니다.
docker images
ubuntu-with-build-essential-qt5-build 이미지가 생성된 것을 볼 수 있습니다.
webnautes@webnautes-laptop:~$ docker images
REPOSITORY TAG IMAGE ID CREATED SIZE
ubuntu-with-build-essential-qt5-build latest cbcfb00b20ae 18 seconds ago 2.55GB
ubuntu-with-build-essential-qt5 latest cd632ff4ef55 16 minutes ago 2.62GB
hello-world latest 74cc54e27dc4 6 months ago 10.1kB
도커에서 GUI 프로그램 실행 테스트
gui 프로그램을 테스트해봅니다.
1단계: 호스트에서 권한 설정
도커 컨테이너가 X 윈도우 시스템에 접근할 수 있도록 권한을 부여합니다.
다음처럼 해도 동작하지만 좀 더 확인이 필요해보입니다.
xhost +SI:localuser:root
2단계: 도커 실행 시 옵션 추가
GPU없이 X11을 사용하도록 ubuntu-with-build-essential-qt5-build 이미지를 실행합니다.
docker run --rm -it \
  -e DISPLAY=$DISPLAY \
  -v /tmp/.X11-unix:/tmp/.X11-unix \
  ubuntu-with-build-essential-qt5-build
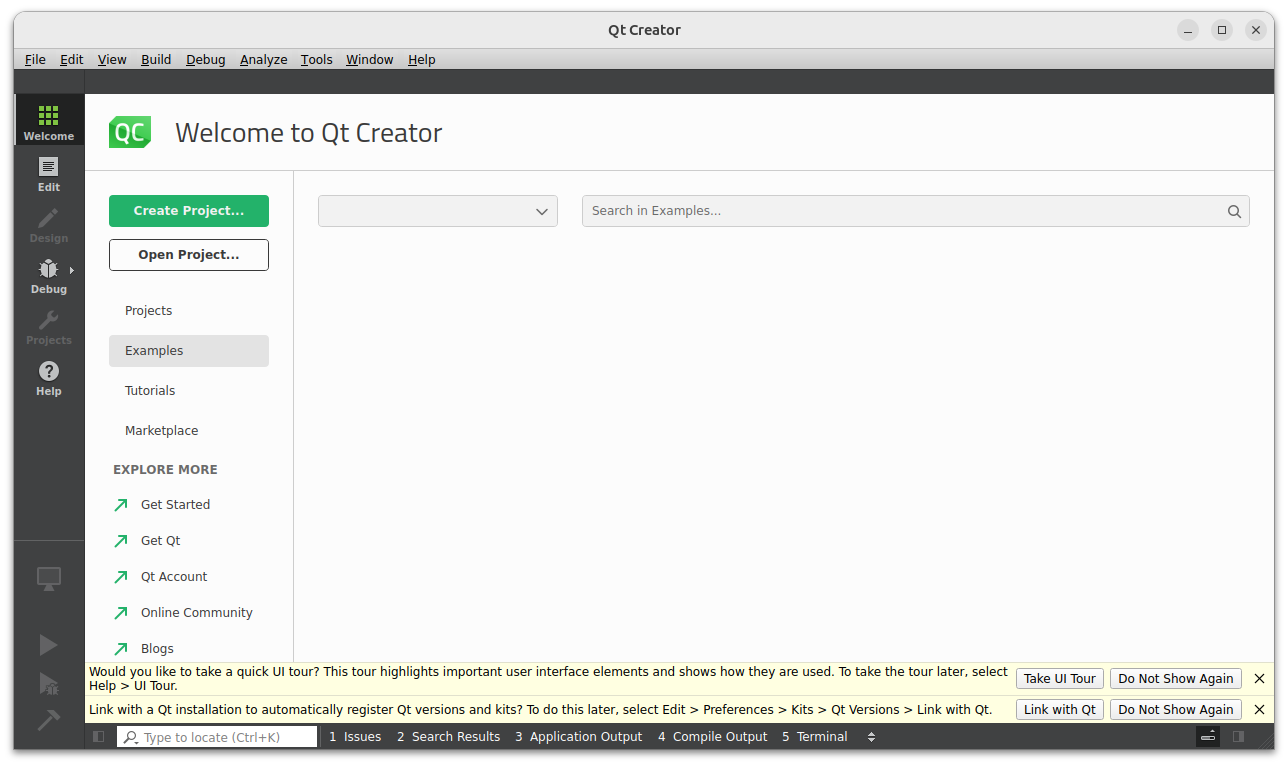
qtcreator를 실행해보면 문제없이 잘 되었습니다.
root@b1925f2060f5:/# qtcreator
도커 제거
도커를 제거합니다.
Docker 그룹 정리
sudo groupdel docker
사용자별 Docker 설정 제거
rm -rf ~/.docker
실행 중인 컨테이너가 있는 경우 삭제합니다.
sudo docker stop $(docker ps -aq)
sudo docker rm $(docker ps -aq)
Docker 패키지 제거
설정 파일까지 모두 삭제합니다.
sudo apt purge -y docker-ce docker-ce-cli containerd.io docker-buildx-plugin docker-compose-plugin
Docker 관련 디렉토리 삭제
실제 Docker 이미지, 컨테이너, 볼륨 등 모든 데이터를 삭제합니다.
sudo rm -rf /var/lib/docker
sudo rm -rf /var/lib/containerd
sudo rm -rf /etc/docker
GPG 키 및 저장소 제거
Docker 저장소와 키를 정리합니다.
sudo rm /etc/apt/keyrings/docker.gpg
sudo rm /etc/apt/sources.list.d/docker.list
정리 후 APT 업데이트
sudo apt update
도커 삭제 확인
docker --version
만약 위 명령에서 다음 메시지가 나오면 완전히 삭제된 것입니다.
bash: /usr/bin/docker: 그런 파일이나 디렉터리가 없습니다
참고
클로드
챗지피티
https://ahnbk.dev/?p=358